Important! In the version 2.0 the syntax was changed completely and it is not backwards-compatible. If you don’t want to switch to a new version then you can check this old documentation for v1.6.
If you do want to switch but already have a lot of specs in the old format you can check this page for quick hints: Galen Specs Language 2.0 comparison with old version
- Comments
- Object definition
- Ranges
- Tagging and Sections
- Variables
- Special Objects
- Specs Reference
- Advanced Specs
- Galen Specs JS Api
Galen Specs Language is quite flexible and gives you the opportunity to express exactly how you want your website to behave on different devices. There are two main parts in page specs file: object definitions and object specs
Comments
All comments should start with ‘#’ symbol in the beginning of a line. If you use ‘#’ symbol somewhere in the middle of text it will be taken as is. That is due to ability to work with CSS locators which might have this symbol in their expression
# This line a comment
# However next line is not a comment
object  css     #container ul li
Object definition
Each Galen spec file normally starts with object definition. It is the place where you give names to page objects and also define the so called locators - the way for Galen to find element on test page. The available locators are:
- id - searches for object by id in DOM
- css - uses CSS selectors to find objects
- xpath - uses XPath expressions
The object definition is defined with @objects keyword and all objects are declared below it.
Lets take a look at the following HTML example and try to define these objects in our spec file
<body>
    <div id='search-bar'>
        <input type='text' name='search' value=''/>
        <a href='#' class='search-button'>Search</a>
    </div>
</body>
Now lets try out all available locators in Galen spec for the example above
@objects
    search_panel            id      search-bar
    search_panel_input      xpath   //div[@id='search-bar']/input[@type='text']
    search_panel_button     css     #search-bar a
Also you can skip the locator type definition. In that case Galen will consider that the given locator is css selector.
@objects
    search_panel            #search-bar
    search_panel_input      #search-bar input[type='text']
    search_panel_button     #search-bar a
Also you can optimize your locators by nesting objects
@objects
    search_panel   #search-bar
        input      input[type='text']
        button     a
This way Galen will automatically wrap the locators in the scope of the parent object and will create object references with the following names:
- search_panel
- search_panel.input
- search_panel.button
Multiple objects definition
Quite often in HTML we have similar objects which we could fetch with a single locator. This can also be done with Galen. Lets take a look at sample HTML code for menu
<ul id='menu'>
    <li><a href='#'>Home</a></li>
    <li><a href='#'>Blog</a></li>
    <li><a href='#'>Categories</a></li>
    <li><a href='#'>About</a></li>
</ul>
It would be nice to define all these menu items with a single css locator like #menu li a. Lets do it in our spec file:
@objects
    menu_item-*     css     #menu li a
As you can see we used asterisk in object name. In this case Galen will find all elements on page and will give them names menu_item-1, menu_item-2, menu_item-3, menu_item-4. As you can see it replaces asterisk with a number of on object on page.
Objects corrections
Sometimes it is hard to fetch the real size and position of page element. This happens rarely but when it happens it gives a lot of headache. You can fix this by using so called corrections. For instance we have an element on page that is located correctly but its width should be by 50 pixels less then what Galen gets. Lets write down this in our spec file:
@objects
    some_test_object    @(0, 0, -50, 0)   id  some-container
Or lets say we have an object but we want to move its boundary box down by 100 pixels and also to the left by 30 pixels
@objects
    some_test_object    @(-30, +100, 0, 0)   id  some-container
Or maybe we need to extend the height of the element by 200 px
@objects
    some_test_object    @(0, 0, 0, +200)   id  some-container
Sometimes we need to specify the exact value in corrections
@objects
    some_test_object    @(0, 0, 0, =200)   id  some-container
Object Groups
Since version 2.2 you can group objects and iterate over all objects in specific group. To declare an object group you can use the following syntax. In the example below we are going to group all major element in skeleton_elements group.
@objects
    header          #header
    menu            ul.menu
    content         #content
    footer          #footer

@groups
    skeleton_elements   header, menu, content, footer
Now we can access all elements in skeleton_elements group by using & symbol:
= Skeleton =
    &skeleton_elements:
        inside screen 0px left right
The statement above is equal to this:
= Skeleton =
    header, menu, content, footer:
        inside screen 0px left right
In case you want to assign multiple elements to multiple groups, you can declare groups with brackets (. For example lets add another group mainframe that will have same elements as in skeleton_elements group but with extra one
@objects
    header          #header
    menu            ul.menu
    content         #content
    footer          #footer
    navigation_bar  #navigation

@groups
    (skeleton_elements, mainframe)  header, menu, content, footer
    mainframe                       navigation_bar
In the example above group mainframe will contain same elements as skeleton_elements group plus navigation_bar element.
Also you can use groups within forEach loop:
= Mainframe =
    @forEach [&mainframe] as item
        ${item}:
            inside screen 10px left
Declaring groups inline with objects
If you don’t want to declare groups in groups section you can do it inside object definition:
@objects
    header          #header
        logo @grouped(image_validation)  img.logo
Ranges
The basis for all specs is a so called “range”. Range is a format of defining boundaries for any value. With the range you may express that the expected value should be exactly ‘0’, or greater than ‘0’, less then ‘0’ etc.
# Exact range
    width 100px

# The value between range
    width 50 to 200 px

# Greater than
    width > 40 px

# Less than
    width < 40 px

# Greater than or equals
    width >= 40 px

# Less than or equals
    width <= 40 px

# Approximate
    width ~ 100 px
As you can see all examples of ranges above end with ‘px’ symbol. This is important for Galen as we define the units in which it should check the values. In case you want to check relative values you can do it by using ‘%’ symbol but then the syntax will be a bit different
# Relative ranges
    width 50 % of screen/width
In the example above we state that the width of some object should take half of the screen. In this case screen is a special Galen object which you don’t need to define in your specs. It has width and height of browser inner window.
You can also mix in the example of range above with relative checks
    width ~ 95 % of screen/width
    height > 40 % of screen/height
    width 30 to 100 % of screen/width
You can also use your own objects for relative checks. For any object you can use ‘width’ and ‘height’ properties like in example below:
@objects
    main                id      main-container
    menu                css     ul.menu
    comments            css     div.comments

= Main section =
    menu:
        width ~ 100 % of main/width

    comments:
        width 40 % of main/width
        height 90 to 100 % of main/height
Another special Galen object you could use is viewport. Similar to screen object it takes the browsers client window. It is useful if you want to check some fixed element on screen which sticks to viewport even when you scroll.
width 100% of viewport/width
Tagging and Sections
Sections are declared with = symbol in the beginning and end of the line. Also in Galen you can have multiple sections within each other. This allows you to structure your test code so that it is easier to read it.
= Header section =
    = Icons and text =
        header.icon:
            inside header 10px top left

        header.caption:
            text is "Greetings!"

    = User section =
        header.username:
            inside header 10px top right
Quite often you need to declare different specs for different conditions (e.g. various devices like mobile, tablet, desktop etc.). You can specify tags in your spec file so that it is easier to manage your layout testing. You can wrap all your checks inside @on statement like this:
= Main section =
    @on mobile
        menu:
            height 300 px

    @on desktop
        menu:
            height 40 px
In case your specs apply to all of the tags you can express that by using * symbol
= Main section =
    @on *
        menu:
            height 70px

    @on mobile
        login-button:
            width 100px
You can also combine multiple tags using comma-separated tag notation
= Main section =
    @on mobile, desktop
        menu:
            height 300 px
Variables
In case you want to use common values for different specs you can declare variables on page like this:
@set
    commonHeaderMargin    10 to 20px
    contentMargin  ~ 20px

= Header =
    header_icon:
        inside header ${commonHeaderMargin} top left

= Content =
    article-description:
        inside main ${contentMargin} left right
Special Objects
There are several special objects in Galen Framework that you can use in your spec without defining them
viewport
Represents the visible area on the page.
= Main =
    feedback_button:
        inside viewport 0px right
        centered vertically inside viewport
screen
Represents the whole page area inside browser even that which is not visible.
= Main =
    menu:
        aligned horizontally screen
parent, self
This element can only be referenced inside a component spec. parent and self are the same and represent the component element itself
= Component =
    icon:
        inside parent 0px top left

    self:
        image imgs/component.png
global
Reserved for global validations that are not related to a specific objects. For instance it could be used for count spec
    global:
        count any menu_item-* is 4
Specs Reference
Galen supports the following specs:
- near - checks that object is located near another object
- below - checks that an element is located below other object
- above - checks that an element is located above other object
- left-of and right-of - check that the object is located near another object from left or right
- inside - checks that object is located inside another object
- width - checks the width of object
- height - checks the height of object
- aligned - checks horizontal or vertical alignment of object with other objects on page
- text - checks the text that is visible on page
- centered - checks that object is centered inside another object
- absent - checks that object is either missing on page or is not visible
- contains - checks that object visually contains other objects inside it
- on - checks that object is visually located on other object
- component - runs a subset of specs from another file within the given object context
- color-scheme - checks the color distribution in the given object area
IMPORTANT! For each spec Galen always checks that all included elements in a spec are visible on page. Galen tries to act as a real user and if a user doesn’t see an object on page then it is not there.
Near
Used to verify that element is located near another element
Take a look at the following example

Now lets try to write a spec for checking that
textfield:
    near button 10px left
Or we can be less strict about the actual range:
textfield:
    near button 5 to 15px left
Now another example for spec near

textfield:
    near button 5px top
Or even more interesting case:

textfield:
    near button 5px bottom left
Or this case:

textfield:
    near button 5px top, 10px left
Below and Above
There is also a way to test if an element is located above or below another element. Actually this could also be done with the previous spec near. But it is good to have a more readable test code so Galen introduces the two specs above and below

caption:
    above description 10 to 20 px

description:
    below caption 10 to 20 px
Left of and Right of
In order to increase readability in version 1.6 were added two specs: left-of and right-of. These specs check that the object is located near another object from left or right. You could still use spec near for this case but left-of and right-of also would work well in terms of readability.
textfield:
    left-of button 10px

button:
    right-of textfield 10px
Inside
Spec inside verifies that an element is visually inside another element. There two ways how you could use this spec:
- inside - checks that element is completely inside
- inside partly - checks only the ranges provided in spec. Doesn’t care if the element is not completely inside
Lets take a look at the following example on a picture:

Now what we can write in a spec
button:
    inside container 10 px top left
A little bit more complicated

button:
    inside container 10px left right, 20px top bottom
But what to do if our button “sticks out” a little bit?

button:
    inside partly container 10px top left
Or... A bit weird case... But why not?
button:
    inside partly container -10px top left
Try to avoid the example above. For the illustrated case it is advised to use spec on
You can also omit the sides definition in the inside spec and just use it like this:
button:
    inside container
That way Galen will only check that the element is completely inside another element. Still it is not a good practice to do so and the advice is – always specify sides to which the element is attached.
Width and Height
Width and height have exactly the same simple syntax

button:
    width 100 px
    height 25px
Or we can also say that width should not be bigger that 100 pixels
button:
    width < 101 px
Relative width and height specs. Lets check that comments sections is stretched to the width of main container

comments:
    width 100 % of main/width
Or we can be less strict and do it like this. This way Galen will not fail if comments section is only by few pixels smaller.
comments:
    width 95 to 100 % of main/width
Aligned
Sometimes you have things which are aligned horizontally or vertically on your website. Quite common examples are menus.
The syntax is the following
- aligned horizontally all - checks that items are aligned horizontally by their top and bottom edges
- aligned horizontally top - check that items are aligned horizontally by top edge only
- aligned horizontally bottom - check that items are aligned horizontally by bottom edge only
- aligned horizontally centered - check that items are aligned horizontally by center
- aligned vertically all - checks that items are aligned vertically by their left and right edges
- aligned vertically left - checks that items are aligned vertically by their left edge
- aligned vertically right - checks that items are aligned vertically by their right edge
- aligned vertically centered - checks that items are aligned vertically by center
Now lets take a look at the following scheme and lets write down the according Galen spec

# By top and bottom edges
menu_item-1:
    aligned horizontally all menu_item-2
And now alignment by only one edge

# By top edge
menu_item-1:
    aligned horizontally top menu_item-2
Vertical alignment by left edge:

menu_item-1:
    aligned vertically left menu_item-2
There is also a possibility to define the error rate within which we don’t care if objects are not aligned. For instance it could be that one object is by 1px higher than the other one. If we are OK with that we can define it in our spec like this:
menu_item-1:
    aligned horizontally all menu_item-2 1px
In the code above we have defined the 1 pixel error rate so galen will not complain if object are misaligned by only one pixel.
Text
There are various ways you could verify text of an element on page. Note that the text that is seen by Galen is not same as it is in HTML code. As Galen relies on Selenium – the text will be returned the same way it appears in a real browser (e.g. white space is ignored). At the moment you can verify text with following specs:
- text is - checks that text is exactly as expected
- text contains -checks element contains expected text
- text starts - element should start with expected text
- text ends - element should end with expected text
- text matches - verifies that text matches Java Regular Expression
Here are some examples of different text specs. Lets say we would like to test the following page element:
<div>Welcome [email protected] to our cool website!</div>
Now lets write down all possible text checks for it
greeting:
    text is "Welcome [email protected] to our cool website!"
    text starts "Welcome"
    text ends "website!"
    text contains "to our cool"
    text matches "Welcome .* to our cool website!"
Text operations
Sometimes you don’t want to check the text case sensitive. For this purpose you can rely on special text operations. At the moment only these operations are supported:
lowercase- changes all letters to lower caseuppercase- changes all letters to upper casesingleline- replaces all newline symbols with space
greeting:
    text lowercase is "welcome [email protected] to our cool website!"
    text uppercase starts "WELCOME"
    text lowercase ends "website!"
    text lowercase contains "to our cool"
    text lowercase matches "welcome .* to our cool website!"
    text singleline is "welcome [email protected] to our cool website!"
CSS Properties
By analogy of text spec the css spec allows you to test the value of a CSS property of a specific element. For instance you can check the font-size, font-family, background-color or any other CSS property you want. Use it in a same way as text property:
login-button:
    css font-size is "18px"
    css font-family starts "Helvetica"
    css font-family ends "sans-serif"
    css font-family contains "Arial"
    css font-family matches ".*Arial.*"
At the moment text operations lowercase and uppercase are not available in css spec.
Important! Galen Framework originally was planned as UI testing tool which is not dependent on CSS and HTML. The use of
cssspecs breaks the original purpose and it was introduced only because of high demand from users. Use thiscssspec rarely and wisely.
Centered
If you want to check that the element is centered inside another element you can of course use the spec inside by defining same range for left and right sides. But there is a problem if it is responsive design. Then there is a special spec called centered. It allows to verify that the element is centered inside or on top of another element with user-defined error rate. Lets take a look at the following scheme:

We could write it down like this:
button:
    centered horizontally inside box
Or if the label is also centered vertically we can include both checks in one line by doing this:

button:
    centered all inside box
But this will fail if a label is not inside box but “sticks out” of it edges. Lets take this example on picture:

As we see here it looks like the label is placed on top of a box. In this case we should write it down like this:
label:
    centered horizontally on box
But what to do if the element is not exactly in a center? What if an item is shifted 10px left or right from the center?

We need the ability to define error rate within which an element should be considered centered. We can specify this in our spec in the following way.
label:
    centered horizontally inside box 10px
Absent
One of the simplest specs in Galen. It doesn’t take any parameters. It is used to check that the element is either missing on page (in HTML code) either it is present but not visible (e.g. style display:none)
comments:
    absent
Visible
Same idea as spec absent but in this case Galen checks that the element is visible
comments:
    visible
Contains
Used to verify that the element contains a list of specified elements.
comments:
    contains comment-header, comment-send-button, comment-textfield
You can also use asterisk to match all other objects so you write less text. For example lets say we have an object menu and in it there other object like: menu_item-home, menu_item-categories, menu_item-about, menu_item-contact. Instead of enumerating all of them in same spec we can write a shorter version:
menu:
    contains menu_item-*
Another case that you might have is when an element is not completely inside. For that you can use spec contains partly. Take a look at the following example
box:
    contains partly box-item-1, box-item-2
On
Verifies that the element is moved from another element from specified corner. Visually it could be considered as if one element located on top of another. Take a look at the following example

user-picture-label:
    on top left edge user-picture 20 px left, 10px bottom
You can also pick a different corner:
user-picture-label:
    on bottom left edge user-picture 20px right, 10 px top
Component
Used for advanced testing in case there are multiple similar complex snippets on page. As an example lets imagine that we have a page where we list user profiles. Every user profile has same layout and we would like to test that somehow.

For the example above we would need a separate spec file where we can define the specs for a component. Later this file will be used in another page spec. So lets create a component spec named user-profile.gspec
@objects
    user-name       css     .user-name
    user-pic        css     .user-pic
    user-age        css     .user-age

= User section =
    user-pic:
        inside parent 10px top left
        width 50px
        height 50px

    user-name:
        inside parent 10px top
        near user-pic 10px right

    user-age:
        below user-name 5px
        near user-pic 10px
Now we are going to test the user profile using the component spec file we have prepared.
@objects
    user-profile-*  css   .user-profile

= All user profiles =
    user-profile-*:
        component user-profile.gspec
In this case Galen will first fetch all objects user-profile-1, user-profile-2, user-profile-3 and then will load a subtest for objects within each user profile scope. This means that you can reuse components within the same page for different object or in general for different pages.
Frame support
In case you have to test a website which has frames and you need to access the elements inside frame you could use component frame spec.
@objects
    banner-frame     css  iframe#banner

= Main section =
    banner-frame:
        component frame banner.gspec
Component arguments
If you need to pass some custom arguments to your component, you can do it like this
= Main section =
    header:
        component header-component.gspec, isUserLogged true, userName "John Johnson"
In the component these arguments will be accessible from ${ ... } blocks. Here is how you can use the arguments from above in header-component.gspec
@objects
    user_name       .user-name

= Header =
    @if ${isUserLogged}
        user_name:
            text is "${userName}"
Count
You can validate the amount of objects on page that match some custom expression.
Count all elements on page
= Main =
    global:
        count any menu_item-* is 3
Count spec takes range argument but without px so you can use it like this
count any menu_item-* is 4 to 5
Or this
count any menu_item-* is < 6
Count only visible elements on page
If you want to count only the elements that are visible you can use visible argument instead of any
count visible menu_item-* is 4 to 5
Count only absent elements
If you need to validate the amount of absent elements that you can use it like this:
count absent menu_item-* is 4 to 5
Ocr
Since version 2.4 it is now possible to use Google Vision API in order to indentify text on selected image. For this to work you need to have a working Google account (check here for more info). Once you have created an account you need to specify your Google Vision Key with galen.ocr.google.vision.key property. After that you should be ready to start using ocr spec with the following arguments:
- ocr text is - checks that text is exactly as expected
- ocr text contains -checks element contains expected text
- ocr text starts - element should start with expected text
- ocr text ends - element should end with expected text
- ocr text matches - verifies that text matches Java Regular Expression
= Checking text =
    header.caption:
        ocr text is "My Awesome Website!"
Color scheme
Used when you need to verify color distribution on object area. Galen takes a picture and then calculates the objects area color spectrum so later you can verify the usage for specific colors. Example:
login-form:
    color-scheme 10% white, 4 to 5 % black, < 30% #f845b7
Also since version 2.3 you can declare a gradient color scheme like this:
login-form:
    color-scheme ~80% white-gray, ~20% #000-#555-#955
Image
Galen Framework also allows to perform more advanced check like image comparison. When you need to make sure your buttons or logos stay the same you can compare them by predefined image pixel to pixel. Example:
menu_item-1:
    image file imgs/menu_item-1.png, error 12px
The above spec will compare object on the screen pixel to pixel with image imgs/menu_item-1.png and will notify if amount of mismatching pixel is higher than maximum allowed 12 pixels.
Galen framework also uses channel on sample image in order to avoid validation of specific area of the image. If you want you can manipulate alpha channel by applying mask filter.
You can also change the assertion from absolute pixels values to percentage like this:
menu_item-1:
    image file imgs/menu_item-1.png, error 4%
In the generated report you can see which image was expected and also you can find the comparison map
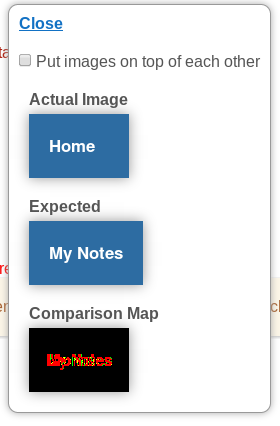
The red pixels on comparison map are the mismatching pixels that are far away from the tolerance value. The yellow pixels are in the range of 30 to 80 color difference from tolerance. The green pixels are the closest to the tolerance value. You can play a bit with this spec by changing the tolerance value:
menu_item-1:
    image file imgs/menu_item-1.png, error 4%, tolerance 80
The tolerance - is the maximum allowed color difference of two compared pixels. By default the tolerance is set to 30. If you increase this parameter – the amount of mismatching pixels will be decreased but than you risk of not having the proper comparison.
Ignoring regions of other objects
Often you need to exclude some specific elements from image validation. This can be achieved using ignore-objects property
content:
    image file imgs/content.png, ignore-objects banner
Also you can list multiple objects with galen object matching syntax
content:
    image file imgs/content.png, ignore-objects [banner-*, ad]
Multiple image comparison
Sometimes you might have different images for different browsers and this will break all your tests. Just for this case you can define different image samples in one image spec like this:
header-text:
    image file image-1.png, file image-2.png, file image-3.png, error 20px
This way Galen compares page element area with each image and selects the one that has less mismatching pixels.
Also you can use a simple expression to match multiple files using star operator:
header-text:
    image file image-*.png, error 20px
Stretching images
When comparing images of different sizes Galen Framework just puts on image on top of another and assumes that the missing pixels are of a black color. But you can change this behavior by stretching the image to fit the original size. Example:
menu_item-1:
    image file imgs/menu_item-1.png, error 4%, stretch
Selecting the area in the sample image
You can also define an area which should be used from the sample image like this:
menu_item-1:
    image file imgs/menu_item-1.png, error 4%, area 10 10 100 30
The area parameter takes 4 values: left, top, width and height
Offset Analyzer
Sometimes you might have an offset of few pixels on the actual image. That will end up in enormous amount of mismatching pixels. If you want to avoid such situation you can use analyze-offset setting. It takes one integer argument that specifies the maximum size of an offset. Galen will search best fitting offset and will compare images with it.
menu_item-1:
    image file imgs/menu_item-1.png, analyze-offset 2
Image filters
Sometimes you might want to apply some filters to compared images to have a smarter image comparison. For instance you can apply blur to images. This might be handy if compared image contains generated noise. Or you can also apply denoise filter to the comparison map. That way you get rid of alone mismatching pixels.
Take a look at the following example:
menu_item-1:
    image file item-1.png, error 1%, filter blur 4, filter saturation 0, map-filter denoise 5
What happens with this check is the following: Galen takes both images and applies blur filter with radius 4. Then it applies saturation filter with level 0 which means complete loss of color and the images become gray. Then it compares the image and builds a comparison map. After these operations it applies denoise filter with radius 5 pixels and removes noise from generated map. And after all these operations it counts the mismatching pixels.
Here is the list of all available image filters:
- blur <radius> - Blurs the image with the given radius of blur.
- saturation <level> - Removes the colors with the given level. The zero value means complete loss of colors. The 100 value – all the colors are left the same. The level 50 – the image is colored by half.
- contrast <level> - Increases the contrast. The allowed range for level is 0 to 258.
- denoise <radius> - Removes noise from image. Applicable only as a map-filter as it only works with black/white images.
- quantinize <colorsAmount> - Makes less colors on the image.
- mask <maskImagePath> - Applies a mask to an image alpha channel which makes pixels transparent according to the color of corresponding mask image pixel. This might be useful if you need to avoid comparison of specific area of the image. Black color on mask means complete transparency and white means no transparency.
- replace-colors <replaceColors ...> with <finalColor> tolerance <toleranceValue> radius <radiusValue> - Allows to selectively replace colors on image. Example
image imgs/object.png, filter-a replace-colors #111 #555-#777 with #fff tolerance 10 radius 2
In case you want to apply filter only to original image – you can use filter-a expression like this:
login-button:
    image file imgs/login-button.png, filter-a blur 10, error 4%
You can also use filter-b expression if you need to apply a specific filter to sample image only
login-button:
    image file imgs/login-button.png, filter-b contrast 200, error 4%
Here are some examples of image filters for the original image:
Original

Blur level 2

Blur level 10

Contrast level 100

Contrast level 200

Saturation level 0

Saturation level 50

Quantinize 2

Quantinize 10

Cropping
The specification of relative layout sizes (rem, em in CSS) can lead to rounding errors in the computed image area sizes, causing areas to seemingly stretch over image borders. The crop-if-outside parameter can be used to force cropping areas to proper image dimensions:
menu_item-1:
    image file imgs/menu_item-1.png, crop-if-outside
If the parameter is left out and an out-of-border area is detected, Galen will report that the specified area is outside the original image.
Advanced Specs
When it comes to testing with Galen you might need to express some more complex specs in your code. In the following paragraphs you can find different ways to make your testing a bit more advanced
Importing
Quite often your website has something similar one each page. Normally it is headers, footers and sometimes the side panel. In case you want to test these for each page you can just import the needed specs. Lets say you have defined specs for header and footer in the following files: header.gspec, footer.gspec. And now you are working on a homepage.gspec where you would like to import the first two specs. You can do it in the following way
@import header.gspec
@import footer.gspec

# and now goes the spec for your home page
In the example above Galen will import all objects and spec from header.gspec and footer.gspec files and merge them with the homepage.gspec. This means that you can then reuse objects from header and footer in your home page spec.
Multiple objects with same specs
So till now you have seen various specs for page objects. But what to do if you want to test exactly the same specs for other objects? In Galen you can use comma separated object notation and simple regex
menu_item-1, menu_item-2, menu_item-3:
    width 100 to 150px
    height 50px
Or same could be written more elegantly
menu-*:
    width 100 to 150px
    height 50px
The example above shows the simplest regular expression. In case you want to match any symbol you can use * symbol. But if you need to match only numbers then you should use # symbol.
menu_item-#:
    width 100px
for Loop
There is also a possibility to declare for loop in case you need to express complex layout for multiple objects. In the following example it will iterate over 9 menu items and will check that each menu item is located from the left side of the following item.
= Main section =
    @for [1 - 9] as index
        menu_item-${index}:
            left-of menu_item-${index + 1} 10px
As you can see you can declare a variable inside a loop and later use it even in javascript statements.
The for loop statement also allow to declare more complex sequence.
= Main section =
    @for [1 - 5, 7, 9, 14, 20 - 25] as index
        menu_item-${index}:
            left-of menu_item-${index + 1} 10px
forEach Loop
In case you don’t want to hard code the numbers and want to match whatever objects you have on the page, you can use forEach loop. It allows to iterate over all objects matching the defined pattern:
= Main section =
    @forEach [menu_item-*] as itemName
        ${itemName}:
            height 30px
But what is more interesting is that you can also define a variable for previous or next item in the loop.
= Main section =
    @forEach [menu_item-*] as itemName, next as nextItem
        ${itemName}:
            left-of ${nextItem} 10px
That way it will iterate over all elements until last one. If you want to change the statement and reference the previous elements in the loop you can do it like this:
= Main section =
    @forEach [menu_item-*] as itemName, prev as previousItem
        ${itemName}:
            right-of ${previousItem} 10px
That way it will iterate starting from second element in the loop
Also you can refer to index (starting from 1) when iterating with forEach loop. This could be useful in case you want to store expected text in a separate array and use it in a loop.
@objects
    menu_item-*        #menu ul li

@script
    data = ["Home", "My Notes", "About", "Contact"];

= Menu =
    @forEach [menu_item-*] as item, index as i
        ${item}:
            text is "${data[i-1]}"
Custom javascript functions in specs
There is a way to use custom javascript functions inside ${ } construction. Lets say you need to put a special function "i18n" that would take care of internationalization. You can do it like this:
Create a file i18n.function.js:
this.i18n = function (name) {
    // ...
    // define a code for handling i18n
};
Now you can use it in your specs. Use script in order to load the javascript:
@script i18n.function.js

greeting-text:
    text is "${i18n('header.greeting.text')}"
Same way you can implement a custom function that would allow you to parameterize checks against only even items of a list. Create a script allEven.js:
this.allEven = function (pattern) {
    var size = count(pattern);
    var parameters = "2";
    if (size > 1) {
       for (var i = 4; i <= size; i+=2) {
           parameters = parameters + "," + i;
       }
    }

    return parameters;
};
In spec file call it like this:
@script allEven.js

@for  [${allEven("menu_item-*")}] as index
    menu_item-${index}:
        height 100px
if Statement
It is also possible to declare conditional checks using JavaScript expressions. Lets take a look at the following example. Imagine we have three different banners:
@objects
    banner-1        id  some-banner-1
    banner-2        id  some-banner-2
    banner-3        id  some-banner-3
And now depending on which of the banners is shown on the page we should run specific specs.
#...
= Banners =
    @if ${isVisible("banner-1")}
        banner-1:
            width 300 px
            height 100 px
    @elseif ${isVisible("banner-2")}
        banner-2:
            width 300 px
            height 100 px
    @else
        banner-3:
            width 300 px
            height 100 px
Warning level for specs
Since version 1.2 it is possible to mark a specific check in your spec file so that once it fails – it is reported with a warning level and does not affect the status of the whole test suite. This might be useful in case you have a bug on your website that you already know and are working on but you don’t want to be constantly reminded about it. As a temporary solution you can put % symbol before the failing check and that’s it. In the resulting HTML report this check will be shown with yellow color.
login-button:
    text is "Login"
    % width 100px
Throwing error
Since version 2.3 you can throw an error from your spec file using @die operator:
@if ${count("menu.item-*") === 0}
    @die "There are no menu items"
Custom Rules
Since version 1.6 you can use rules for your specs, which work as sort of a user-defined functions. Custom rules allow you to group complex specs and give them a better naming. Also they allow you to come up with a much more readable spec file. Lets take a simple example. Imagine you want to test that the icon is a square. So you need to test that its width is equal to its height. And for example there could be a lot of other elements on page which should have the same rule. You can write it like this:
@rule %{name} should be squared
    ${name}:
        width 100% of ${name}/height

# This is how you can use your spec

= Main section =
    | header-icon should be squared
    | footer-icon should be squared
As you can see you can create a mapping to parameters in your rule using %{...} syntax. When you use a rule in your spec with | symbol galen fetches the values from the rule text and provides them in the parameter context. That gives you the possibility to use custom parameters in your specs.
Custom Rules: rules in object context
You can also create rules to serve on an object context. Lets take the above example and change its usage like this:
@rule should be squared
    width 100% of ${objectName}/height

= Main =
    header-icon:
        | should be squared

    footer-icon:
        | should be squared
As you can see we didn’t provide any custom parameters but still Galen provides us with objectName parameter. This is possible because the rule is used on an object scope.
Custom Rules: user-defined regular expressions for parameters
By default Galen Framework uses .* regular expression to match the parameter name in rule text. But you can change this behavior by providing custom regex. For example you could have a situation where you need only to match digits
@rule %{object} should be squared with %{size: [0-9]+} pixel size
    ${object}:
        width ${size} px
        height ${size} px

= Main =
    | logo should be squared with 100 pixel size
Custom Rules: JavaScript based rules
If you need to describe a more complex situation you could use JavaScript for rules. Here is an example how to create a JavaScript-based rule that check that the elements are equally distant from each other. You need to define a rule in a separate js file. The rule represents a callback which takes two arguments: objectName and parameters:
- objectName - represents the name of an object on which the rule was applied. Passed as
nullin case the rule was applied on a section level without any object. - parameters - represents an object with fields that were defined in the rule text. For instance if you defined a rule with text
located near %{name} with %{distance} pixel marginin the end Galen will parse that rule and will provide a structure which you can use asparameters.nameandparameters.distance
Inside the callback you can create your specs using two functions: addObjectSpecs and addSpecs
- addObjectSpecs(objectName, specs) - this function should be used in case the rule is applied on section level and on on the object level. It takes the following arguments:
- objectName - a name of an object for which the specs should be added.
- specs - an array of String. Contains the list of specs which should be added to the specified object
- addSpecs(specs) - this function can be used in case a rule is applied on object level. It takes only one argument – array of String, which represents a list of specs that should be added to the object on which the rule was applied.
We can put in my-rules.js file the following:
rule("%{objectPattern} are equally distant from each other", function (objectName, parameters) {
    // Searching for all objects with user-defined pattern
    var allObjects = findAll(parameters.objectPattern);

    if (allObjects.length > 1) {
        var distance = allObjects[1].left() - allObjects[0].right();
        for (var i = 0; i < allObjects.length - 1; i++) {
            var nextObject = allObjects[i + 1];

            this.addObjectSpecs(allObjects[i].name, [
                "near " + allObjects[i + 1].name + " " + distance + " px left"
            ]);
        }
    } else {
        throw new Error("Not enough objects for pattern: " + parameters.objectPattern);
    }
});
And now if you execute this my-rules.js file in your spec you can use the rule like this:
@script my-rules.js

@objects
    menu_item-*        #menu li a

= Menu =
    | menu_item-* are equally distant from each other
Rules Body
When writting custom rules in your page spec you can also create rules that will have a callback (body). A callback is invoked via @ruleBody statement. For example you can create a custom condition like this:
@rule if %{objectName} is visible
    @if ${isVisible(objectName)}
        @ruleBody
Later in your spec file you can use this rule instead of standard if conditions:
= Main section =
    | if banner is visible
        banner
            width 1000px
Rules Body using JavaScript
In JavaScript based rules you can invoke rule body with doRuleBody function:
rule("if %{objectName} is visible", function (scopeObject, parameters) {
    if (isVisible(parameters.objectName)) {
        this.doRuleBody();
    }
});
Notes for specs
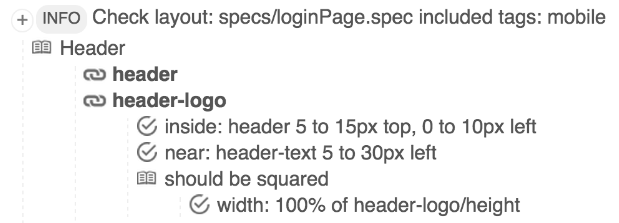
Sometimes it is hard to understand why a certain validation was chosen in a spec file. Comments could help but what to do with resulting HTML report. You would not be able to see those comments in it. Just for this situation in version 1.6 was introduced a small improvement that allows you to add notes for a specific spec. Just a add a text surrounded with double-quotes before the spec.
header-logo:
    inside header 5 to 15px top, 0 to 10px left
    near header-text 5 to 30px left
    "should be squared" width 100% of header-logo/height
In the resulting report you would get something like this. As you can see on the screenshot, Galen creates a subsection under test object and puts that single spec inside it:
Galen Specs JS Api
In the galen specs you can use JavaScript blocks using ${ ... } syntax. In these js blocks you can access these variables and functions from Galen API:
- count( objectPattern ) - counts the amount of objects matching the given
objectPattern.
@for [ 1 - ${count("menu_item-*")} ] as objectName
    ...
    ...
- find( objectName ) - finds and returns an element with given name. The returned element has the following properties and functions:
- .left() - return the left edge position from the left edge of the screen
- .right() - return the right edge position from the left edge of the screen
- .top() - return the top edge position from the top edge of the screen
- .bottom() - return the bottom edge position from the top edge of the screen
- .width() - returns the width of the element
- .height() - returns the height of the element
- .isVisible() - returns true if the element is visible on page, false – if hidden or absent
- .isPresent() - returns true if the element is present in the DOM of the page, false – if absent
- .name - a name of the element
@set menuMargin ${find("menu_item-2").left() - find("menu_item-1").right()}
- isVisible( objectName ) - returns true if the element with given name visible on page, false – if hidden or absent
- isPresent( objectName ) - returns true if the element with given name present on page, false – if absent
- findAll( objectPattern ) - returns an array of elements which names match the given pattern.
Also you can have access to viewport and screen objects
- viewport - A page element which represent a current viewport in a browser
    ...
    header:
        width ${viewport.width() - 100} px
    ...
- screen - A page element which represent a current screen in a browser
    ...
    header:
        width ${screen.width()} px
    ...
Comments
We have moved all the discussions to Google Groups. From this moment, if you have problems with your test code or some issues with installation, please ask your questions in https://groups.google.com/forum/#!forum/galen-framework.